How To Refoam Speakers
Like everything, speakers are prone to wear and tear over long periods of use.
Just as you're settling down to listen to your favorite song, you hear it. A slow, yet significant, ebbing of sound that starts to worsen. Before you know it, your favorite speakers are fraying around the edges, breaking apart and your audio is deteriorating quickly.
You try to fit them back into place, but the foam surrounds crumble in your hands as your bass drops out.
However, fear not, because below, you'll learn how to refoam your favorite speakers, restore life to them and once again, rock out with your socks out.
Why Do Speakers Need To Be Refoamed?
As much as we don't like to hear it, speakers don't last forever.
Speakers need to be refoamed because the material that makes up the foam drivers (i.e. the rings) surrounding the speaker deteriorates naturally over time. Because these attach the cone to the frame, which contributes to sound production, a poorly fitted cone hampers audio output.
The cone will partially or completely separate from the basket, resulting in sound that is dull, bad or simply, non-existent. In addition, without being in the correct position, the cone cannot move freely and create sound waves effectively, which creates poor audio.
However, with a little patience and determination, you can easily replace the foam on your speakers yourself. Our helpful guide below will explain exactly how to do that.
How To Refoam Your Speakers
Typically, refoaming can take anywhere between 12 - 24 hours, depending on your speakers, drivers, the glue you're using, and your repair setup.
Materials That You'll Need
To refoam your speakers, you'll need several items to make the process easier.
The majority of these can be bought from your local supermarket. Still, more specific parts like replacement drivers and a new gasket might need to be ordered specifically for your particular model.
In short, you'll need the following:
- Replacement drivers that fit your speaker.
- A new speaker gasket, if yours is broken.
- New dust caps, if yours are damaged.
- A sharp, retractable knife.
- A razor blade.
- A screwdriver.
- A small, stiff bristle brush.
- A tube of adhesive glue.
- Rubbing alcohol.
- Cotton wool, or paper towel.
- A soldering gun and soldering wire.
- A hairdryer.
- A disposable rag.
- Wood restoring polish.
- A disposable towel.
- Small securing clamps.
- A workbench or workstation.
Prepare Your Workstation
To get started, place your disposable towel down on top of your workstation. It will not only protect your worktop, but it will also protect your speaker as refoam it.
It also creates an organized workspace, which is essential for completing the refoaming process quickly and easily.
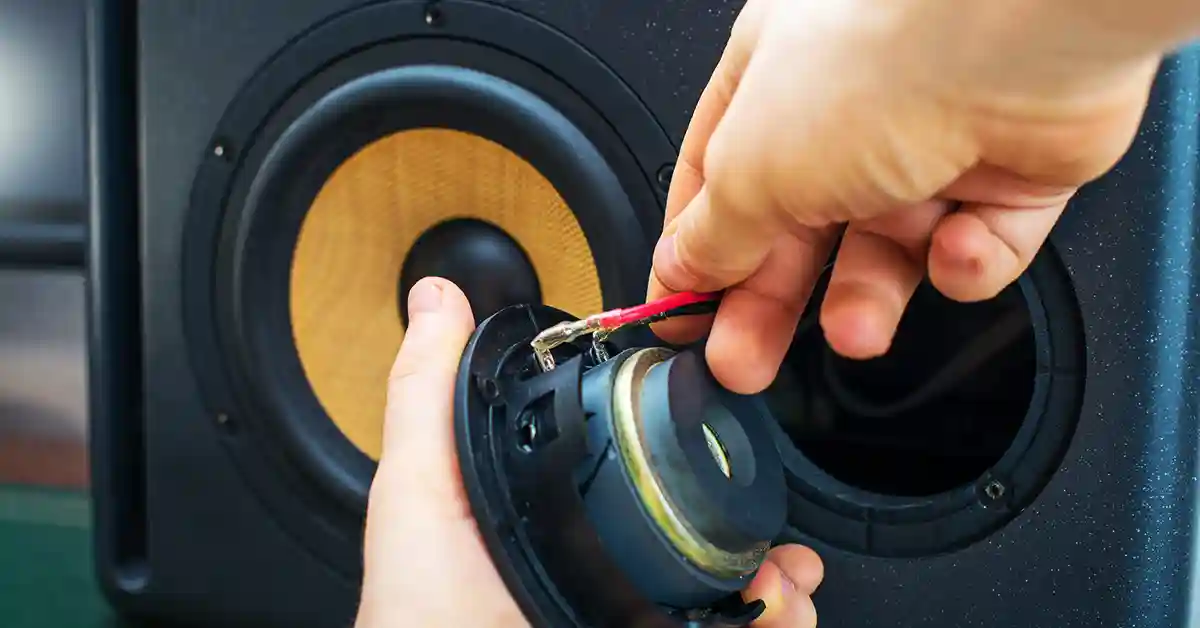
Disassemble Your Speakers
Next, you'll want to remove the speaker from its housing unit by removing any screws holding it in place. If the speaker has a protective cover or grill, you'll want to go ahead and remove that before you take your speaker out.
Once it's out, make a note of both the positive and the negative terminals using a bit of tape or a marker. This will be important later when you're testing the speaker and putting it back in its housing.
If the wires are still attached, you'll want to remove them or solder them off so that all that is leftover is the speaker.
Clean The Speaker Cabinets
Although a small but subtle touch, now is the ideal time to freshen up your speaker's case.
Use your rag to clean the housing inside and out, removing debris, dust, or scuff marks that may have accumulated over time. Depending on the material your speaker casing is made from, now is an ideal time to apply some wood polish to the wood and let it settle while you repair the speaker.
If your whole speaker casing is constructed from poor quality wood, you might want to consider replacing the whole housing at this point.
Remove The Old Foam Surrounds
First, start by picking at the old surrounding foam with your fingers to remove the bulk of it. Depending on how much there is, it should come off in large pieces or chunks.
Continue until most of the foam has been removed, until you can't pick at it anymore. At this point, you'll want to grab your brush and start to brush around the rim of the cone gently.
Note:
Be careful during this phase, as you don't want to cause any damage to the paper that makes up the cone. Use firm brush strokes, but do not pierce or puncture the cone.
At the same time, try to remove as much foam from the gasket and basket too.
Removing The Gasket
If your speaker has a gasket, now is the best time to remove it. Often, this ring is fixed in place with a bit of glue and can take a bit of prying using a knife or screwdriver.
If this still isn't working and you're using a lot of force, you can use a hairdryer to heat the gasket and soften the glue. Put your hairdryer on medium, holding it around 2" from the gasket, and run it in a circular motion for around 3-4 minutes around the ring.
Once done, slip your knife under the gasket and gently pry it loose. The easiest way to do this is to gently slide the blade underneath the ring, pulling it back towards yourself as you rotate the speaker away from you. Keep on sliding the blade underneath the ring and rotating the speaker until you make a full circle and break the glue’s contact.
Note
Be gentle, as older rings are usually from the factory and look much better, although they can be damaged easily, which might delay the repair process.
Removing Your Dust Caps
If your dust caps are damaged or dented, now is the best time to replace them. If not, you can skim over this section.
Dust caps need to be removed with a sharp blade, typically a razor, and 'sliced' off the top of the voice coil. Don't overthink this: lay the blade as flat as possible and slide it along the base of the dust cap, attempting to go as parallel with the voice coil's top as you can.
Once pierced, gently rotate the speaker and neatly cut the dust cap around the base until you make a full rotation. Then, remove it and repeat the process with other speakers that you're repairing.
Shim The Voice Coil
Shimming is important for properly aligning the coil within the speaker as the glue holding the drivers takes hold. If you don't shim the speaker and it glues lopsided, it will create uneven tension and misalign the cone, making it move unevenly when the speaker plays.
This will cause friction, poor sound, and possibly further damage. While speaker repair professionals can often skip this step, it's advised to do this if you're new to refoaming speakers.
Once the dust cap is removed, ready your shims and insert them in the voice coil between the wire and the outside casing.
Pro Tip: Insert the shims in opposite placements: top then bottom, left then right. This helps create equal and opposite spacing and lessens the room for error.
Once the shims are set, you can go ahead and continue with the foam repair.
Glue The Driver To The Cone
Now to the exciting part and the actual refoaming process.
Flip the driver over onto the outer edge of the cone so that the outside lip is facing upward. Gently squeeze the tube of glue until ⅛" of a bead of glue comes out, and place this on the inner edge of the driver. Gently rotate the speaker until the bead makes its way evenly around the whole inner lip.
Note: Do not apply glue to the foam, as doing this will make the foam curl, making the entire repair process incredibly difficult.
Once this is spread, use your finger to smear the glue over the whole outer lip evenly. Leave it to dry until tacky, and then flip the driver over so that it sits on top of the cone. Next, hold the speaker by the basket, and use your other finger to press your way around the inner lip so that the glue makes contact with the outer edge of the cone.
Glue The Driver To The Outer Edge
At this point, the foam driver should be glued firmly to the outer edge of the cone.
Now, you'll glue the driver to the basket, officially connecting the cone to the driver and the driver to the frame of the speaker. Next, maintaining a similar gluing etiquette, slide the nozzle of the glue tube under the outer drive edge and place ⅛" of a bead of glue on the speaker basket's edge.
Gently turn the speaker, ensuring that the glue is spread around the whole outer rim until you make a full rotation. Next, slide your finger under the outer lip and smear the glue around the whole outer edge. Now, wait until it turns tacky and get ready to glue.
Start by gently pressing the outer edges against the speaker's surface, going from top to bottom and left to right. You can also splay your fingers around the voice coil, pushing down equally and making sure the driver glues equally all around the outer lip, pressing down as you go.
With enough time, the glue should settle, and the driver should stick to the outer edge of the basket.
Attaching The Gasket
By now, the driver should be securely fixed to the speaker.
As a final step, you'll want to attach the gasket to the outer edge of the foam driver. Follow the same gluing process, squeezing ⅛" bead of glue onto the outer top edge of the driver.
Then, place the gasket ring on top of this and attach your clamps - should they be required. You can leave the glue to dry and admire your hard work at this point.
Attaching The Dust Caps
One of the final steps is to attach the dust caps.
Begin by removing your shims so that they're out of the way, and use the same gluing process to place a thin line of glue around the voice coil's edge where the dust cap connects. Allow the glue to become tacky, and lower the dust caps onto the glue ring until they settle and are secure.
By this point, you're well on your way to finishing up.
Reconnect Your Speakers
Get your soldering gun and wire ready, and line up the correct wires with the speaker terminals.
Ensure that you're connecting the correct terminals: positive wire with the positive terminal and the negative wire with the negative terminal.
Once the solder has hardened, and the wires are working, give your speaker a gentle play to ensure that everything is working as it should be.
Reassembling The Speakers
Now, you can put your speakers back into their housing and secure them with the right screws.
Ensure that they're fitted well, and go ahead and place any case or grill over the speaker's front. Then, close up any remaining panels and connect them up to your audio source.
Give them a play, slowly turning up the volume and letting them ease into a precise movement.
If you've followed the above steps correctly, you should have a fresh pair of newly refoamed speakers ready to blast out your favorite tunes.
Conclusion: Try Those Refoamed Speakers Out
By now, you've followed our useful speaking refoaming guide, and you have a pair of newly refoamed speakers standing in front of you.
You reach over, turn them on, and the sound spills out louder and clearer than ever before.
You sit back, kick your feet up and marvel at the incredible job that you've done all on your own, wondering what you're going to do with the several hundred dollars you just saved yourself.
Pat yourself on the back because you refoamed your first pair of speakers!
Related Articles